
Last Reviewed: May 2026
TL;DR / Key Takeaways:
- Label every box on at least two sides — never just the top. Tops are inaccessible when boxes are stacked.
- A color-coding system by destination room cuts unloading time dramatically and costs almost nothing to implement.
- Every label should include: destination room, general contents, priority level, and fragile designation if applicable.
- Write FRAGILE in large red marker on every side of any box with breakable contents — not just the top, not just a sticker.
- Number your boxes and keep a master inventory list. If a box goes missing, you’ll know immediately what was in it.
- Label as you go, not at the end. Sealing unlabeled boxes and labeling them later produces inaccurate labels and lost time.
Labeling moving boxes is one of those tasks that seems trivial until you’re standing in a new home surrounded by 80 unlabeled or vaguely labeled boxes, trying to find the coffee maker. Or watching movers carry box after box to the wrong room because the labels aren’t clear enough to act on quickly. Or discovering a week after your move that a box marked “misc” contains your grandmother’s china alongside a collection of random office supplies.
Good labeling takes an extra 30–60 seconds per box during packing. Bad labeling costs hours — sometimes days — during unpacking. This guide covers the complete labeling system: what to write, where to write it, how to implement color-coding, how to manage a box inventory, and the specific mistakes that cause the most trouble.
This guide fits into the broader packing system covered in: How to Pack for a Move (Step-by-Step) and our Packing Room-by-Room Checklist.
The Core Labeling System: Four Elements Every Box Needs
Every box you seal should have four pieces of information on it. Missing any one of them creates a specific problem at the other end of the move.
Element 1: Destination Room
The destination room is the single most important piece of information on any box. It tells movers, helpers, and your future self exactly where the box belongs in the new home — without having to open it, ask questions, or guess.
Write the destination room in large, clear letters on at least two sides of every box. Not the room it came from — the room it’s going to. These are sometimes the same (bedroom items going to the bedroom) but not always (items from a storage closet going to the home office, or items from a guest room going to a dedicated storage area in the new home).
Use the room names that match your new home, not your current one. If your new home has two bedrooms, label boxes “Master Bedroom” and “Second Bedroom” — not just “Bedroom.”
Element 2: General Contents
A brief description of what’s inside — enough to identify the box without opening it. “Kitchen — pots and pans” is useful. “Kitchen — dishes, glasses, mugs” is useful. “Kitchen stuff” is not useful. “Miscellaneous” is never useful.
You don’t need an exhaustive inventory on the label — that’s what the master box list is for (covered below). The label just needs enough information to make priority unpacking decisions without opening boxes. “Master Bedroom — winter clothes” tells you this box can wait. “Kitchen — coffee maker and supplies” tells you this one should come off the truck early.
Element 3: Priority Level
A simple priority designation on each box dramatically improves unloading efficiency and the first-night experience in the new home.
- OPEN FIRST: The essentials box and anything you need immediately — one set of sheets, the coffee maker, toilet paper, phone chargers. These boxes come off the truck first and go straight to their destination.
- PRIORITY: Boxes you’ll need in the first 48 hours — basic kitchen supplies, bathroom essentials, a few days of clothing. Unload before the end of moving day.
- STANDARD: Everything else. Unpack in the days and weeks following the move at a comfortable pace.
Write priority level in a different color from the other label information — red marker for OPEN FIRST and PRIORITY boxes stands out against black marker for the rest of the label.
Element 4: Fragile Designation
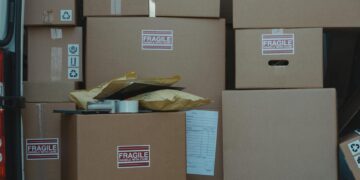
Any box containing breakable items needs a clear fragile designation — not a small sticker that blends into the box, but large red letters on every side: FRAGILE. Add upward-pointing arrows on the sides to indicate which end is up.
Why every side: when boxes are stacked in a truck or storage unit, the top label is inaccessible. A fragile label only on the top is invisible to anyone handling the box from the side. Movers handle dozens of boxes per move — clear, prominent, multi-side fragile labeling gets noticed; subtle labeling doesn’t.
Where to Write Labels: The Two-Side Minimum Rule
Label every box on at least two sides. Four sides plus the top is better for fragile boxes. Never label only the top.
The reason is simple physics: boxes in a moving truck are stacked. When a box is in a stack, its top is underneath the box above it — completely inaccessible. A box labeled only on top might as well be unlabeled once it’s loaded. Side labels are visible regardless of how boxes are stacked or arranged.
For maximum efficiency, position labels on adjacent sides rather than opposite sides. When boxes are arranged in rows, adjacent-side labels mean at least one label faces outward in any configuration.
Where on the Side to Write
Write labels in the upper third of each side — not at the bottom. When boxes are stacked, the bottom of the upper box obscures the bottom of the lower box’s sides. Labels in the upper portion of each side remain visible even when boxes are stacked two or three high.
The Color-Coding System: How to Set It Up and Why It Works
Color-coding is the highest-leverage labeling upgrade available — it takes ten minutes to set up, costs almost nothing, and cuts unloading time significantly by allowing anyone carrying boxes to sort by color rather than by reading.
How to Set Up the System
Assign one color to each room in your new home before you start packing. Use colored packing tape or large colored dot stickers — one color per destination room, applied to every side of every box going to that room.
Example color assignments:
- Red tape: Kitchen
- Blue tape: Master Bedroom
- Green tape: Living Room
- Yellow tape: Bathrooms
- Orange tape: Second Bedroom / Kids’ Room
- Purple tape: Home Office
- Pink tape: Guest Room
- Black tape: Garage / Storage
Write this key on a piece of paper or print it out. On moving day, post it prominently at the front door of the new home — taped to the door or displayed on an easel inside the entryway. Every person carrying boxes can match their tape color to the key and go directly to the right room without asking.
Why Color-Coding Works Better Than Reading
Reading requires focus and slows movement. Color recognition is nearly instantaneous. A mover carrying a heavy box doesn’t need to stop, read, and think — they glance at the tape color, match it to the key, and keep moving. This is the difference between a smooth unloading process and a constant stream of “where does this one go?”
Color-coding also works for helpers who may not be familiar with your home layout — family members, friends, or professional movers who’ve never been to your new home. The key at the door tells them everything they need to know without a tour.
Combining Color-Coding With Written Labels
Color-coding and written labels work together — they’re not alternatives. Color handles the routing decision (which room). The written label handles the content decision (what’s inside and whether it’s a priority). Both are necessary; neither alone is sufficient.
The Master Box Inventory: Why to Keep One and How
A master box inventory is a numbered list of every box you pack, with a brief description of its contents. It sounds like more work than it’s worth — until you’re looking for your laptop charger or your child’s medication and can’t remember which of 75 boxes it’s in.
How to Maintain a Box Inventory
Number every box sequentially as you pack it. Write the number prominently on the top and one side of each box. In your inventory document, record the box number, destination room, and brief contents description.
The inventory can be a physical notebook, a notes app on your phone, or a simple spreadsheet. The format doesn’t matter — consistency does. Every box gets a number, every number gets an entry.
Example inventory entries:
- Box 1 — Kitchen — coffee maker, filters, mugs (PRIORITY)
- Box 2 — Master Bedroom — winter sweaters, scarves
- Box 3 — Living Room — framed photos, candles (FRAGILE)
- Box 4 — Kitchen — pots and pans lids, baking sheets
- Box 5 — Office — books (heavy)
When the Inventory Pays Off
The inventory earns its creation time in four specific situations:
- Finding something specific: “Where did I pack the baby monitor?” → search the inventory by keyword rather than opening boxes.
- After a long-distance move: If boxes are delivered over multiple days or from storage, the inventory tells you immediately if a box didn’t arrive.
- Insurance claims: If something is damaged or lost, the inventory provides documentation of what was in the box and its value.
- Prioritizing unpacking: Review the inventory to identify which boxes contain items you need first, rather than opening boxes at random to discover their contents.
Photograph Each Box Before Sealing
An optional but highly useful addition to the inventory: photograph the contents of each box before sealing it, and save the photos organized by box number. This takes seconds per box and provides visual documentation that’s often faster to search than written descriptions — particularly for boxes with many small items.
Labeling Specific Box Types
Fragile Boxes
Fragile boxes deserve maximum labeling effort:
- Write FRAGILE in large red marker on all four sides and the top
- Add upward-pointing arrows on every side
- Note the specific fragile contents: “FRAGILE — China” or “FRAGILE — Glassware” helps movers understand what they’re dealing with
- Apply the color-code tape for the destination room as usual
- Add a priority designation if the contents need to be set aside carefully rather than stacked
Heavy Boxes
Boxes of books, tools, or canned goods should be labeled HEAVY on at least two sides. This alerts movers before they lift — preventing injury and preventing the box from being stacked under lighter items where the weight would crush them.
The Essentials Box
The essentials box gets special treatment. Label it OPEN FIRST in large red letters on every side and the top. Add your color-code designation for where it should go (usually wherever you’re unpacking first — often the kitchen or master bedroom). Load it last onto the truck so it comes off first.
Do Not Pack Boxes
Items you’re not boxing but moving loose — furniture pieces, rolled rugs, lamps — should have a label attached directly to them (use masking tape with writing, or a luggage tag) indicating their destination room and any handling notes. A rolled rug with no label in a truck full of items is an unidentified object at the destination. A rolled rug labeled “Living Room — GREEN” with a green tape stripe tells every helper exactly where it goes.
Boxes Going to Storage, Not the New Home
If some boxes are going directly into storage (a storage unit, a garage, or a basement at the new home) rather than being actively unpacked, label them clearly with their destination and “STORAGE — DO NOT UNPACK.” This prevents helpers from carrying storage boxes into living areas or, worse, unpacking them when they weren’t meant to be opened.
Tools and Supplies for an Effective Labeling System
- Permanent markers: Buy a pack of four or more — they disappear constantly on a packing project. Black for general labeling, red reserved exclusively for FRAGILE and priority designations so the color coding remains meaningful.
- Colored packing tape: One roll per destination room. Applied as a stripe on every side of every box for that room.
- Large colored dot stickers: An alternative to colored tape for color-coding — one dot per side per box. Available in office supply stores in packs with multiple colors.
- Pre-printed moving labels: Available with common room names and FRAGILE/HEAVY/OPEN FIRST pre-printed. Useful as supplements to handwritten labels for consistent appearance, but handwritten labels are entirely effective on their own.
- A box cutter: Keep it accessible — not packed — throughout the move for opening boxes as needed at the destination.
Common Box Labeling Mistakes That Cause Real Problems
- Labeling only the top: The most common mistake and the easiest to fix. Label two sides minimum, every box, every time.
- Vague contents descriptions: “Bedroom stuff,” “misc,” “random” — these labels tell you nothing at unpacking time. Be specific enough that you can make a priority decision without opening the box.
- Not labeling fragile boxes on every side: A fragile sticker on the top that’s covered by the box above it is an invisible fragile sticker. Red marker, all sides, every fragile box.
- Labeling the room the box came from instead of where it’s going: The label should reflect the destination in the new home, not the origin in the current home. These differ more often than people expect.
- Mixing rooms in one box: “Kitchen and bedroom” is not a useful label because it doesn’t tell you which room to put the box in. One room per box, always — and if you must mix for space reasons, label the predominant destination and note the mixed contents clearly.
- Sealing boxes and labeling them later: Sealing a box breaks the momentum of labeling accurately. Label while the contents are still fresh in mind, immediately before or after sealing.
- Not designating priority: Without priority designations, every box gets treated equally at the destination — which means you might unpack winter holiday decorations before finding the pot for your first home-cooked meal.
- Using a color-coding system without posting the key: A color system without a visible key at the new home destination requires everyone carrying boxes to memorize the code. Post the key at the front door.
What the Complete System Looks Like in Practice
Putting it all together: here’s what a well-labeled box looks like in practice, and what the labeling moment looks like during packing.
When you finish filling a box:
- Fill to the top with items or crumpled packing paper
- Seal the box with packing tape — H-pattern on top and bottom
- Write the destination room and contents description in black marker on two sides, in the upper third of each side
- Apply the color-code tape stripe to every side
- If fragile: write FRAGILE in red marker on all four sides and the top; add upward arrows
- If heavy: write HEAVY in black marker on two sides
- Write the box number on the top and one side
- Add the priority designation if applicable (OPEN FIRST / PRIORITY in red)
- Record the box number and contents in your master inventory
This process takes approximately 60–90 seconds per box once you’re in a rhythm. For a move with 60 boxes, that’s 60–90 minutes of labeling time total — a small investment against the hours of confusion that poor labeling creates.
Label Moving Boxes Once, Unpack With Confidence
The labeling system described here isn’t complicated — it’s just thorough. Destination room on two sides. Color-code stripe on every side. Fragile in red on every side. Priority designation on boxes you need immediately. Box number referenced against a master inventory. These elements together produce a move where boxes go to the right room the first time, fragile items are handled appropriately, and you can find anything in your first week without opening random boxes until you find it.
The 60 seconds per box you spend labeling is the best time investment in your entire packing process. Spend it.
Related guides:
- How to Pack for a Move (Step-by-Step)
- Packing Room-by-Room Checklist
- What to Pack First When Moving
- Moving Hacks That Save Time and Stress
- How to Pack Fragile Items Safely
About the Author
For the past five years, I’ve owned and operated a moving and portable storage company, helping real people navigate one of the most stressful experiences there is—moving.
I’ve seen it all: last-minute packing chaos, broken boxes, missed timelines, and way too much bad advice online.
That’s exactly why I created Home Moving Secrets.
This site is built to give you simple, practical, no-BS moving advice that actually works—from packing smarter and saving money to staying organized from start to finish.
Everything here is based on real-world experience, not guesswork.
My goal? To help you move smarter, stress less, and feel in control every step of the way.
Last reviewed: April 2026
Want our FREE moving guide? Subscribe to our email list.
Looking to learn more about our Ultimate Moving Planner Bundle?
The stress-free, step-by-step system to plan your move in hours—not weeks.
Moving is overwhelming…boxes everywhere, deadlines piling up, utilities to transfer, address changes to remember, and a million tiny tasks you know you’re forgetting.
But it doesn’t have to feel like chaos.
The Ultimate Moving Planner Bundle is your complete AI-powered moving system that turns your entire move into a simple, organized, step-by-step plan—customized to your exact situation.
Are You a Moving Company?
Want more customers like the ones reading this?
We created a simple AI-powered system that helps moving companies:
- Generate more local leads
- Book more jobs
- Improve their online presence